Tuesday, 28 April 2009

Oh Qt, you almost had me sold

The past week and a bit, I've been getting to know more about the Qt cross platform toolkit. It's one of those software toolkits that looks like the total package. At first glance, it seems to have all the attributes I was after:
  • Multi-platform
  • High-performance
  • Rich set of features
  • Excellent documentation
  • Powerful IDE
It is one of those C++ libraries that would make we want to seriously relearn C++ :-) (I haven't really used C++ since my University days, ie. 5 years ago!)

I was about to possibly consider using this toolkit for one or more of my company's future commerical software projects, because it seems to have ticked all the right boxes...

... until I saw this legal disclaimer:
You must purchase a Qt Commercial License from Qt Software or from one of its authorized resellers before you start developing commercial software. The Commercial license does not allow the incorporation of code developed with the Qt GNU LGPL v. 2.1 or GNU GPL v. 3.0 license versions into a commercial product.
IANAL, but as a Qt newbie, this is an absolute bummer. It means if I used the Open Source edition for evaluation purposes, as a testbed for ideas and concepts (because we can't just dive in head first without testing the waters), they are forever bound under the Open Source licensing terms. I'm aware a 30-day commercial evaluation license exists, but in my line of work, 30 days flies by real quickly.

While I'm all for Open Source software, this is really disappointing in my company's interests. If I was to use Qt in my company, I would want to use it under the commercial license for peace of mind (even though LGPL would probably be safe enough). To me, that statement reads more like:
If you decide to purchase a Qt commercial license, you better damn well know what you're going to do with it.
Operating essentially as a "one-man band" developer in my company, it's quite hard to justify a purchase of a commerical license to "learn" this toolkit which at the end of the day, may not do what I was originally hoping it would do. It is even harder in this economic climate (It's cliché I know).

This would be like saying, if you use MapGuide Open Source to serve your maps and spatial data, you can't upscale to MapGuide Enterprise (or even Topobase) in the future. Others may not think this is the most suitable analogy :-)

I may have come off as ranting a bit, but I'm not really. I guess I'll have to shelve my plans for using Qt in my company for now (or convince them it is safe to use LGPL libraries). Maybe I'll come back in a year or two, when I'm no longer a Qt newbie and can dive into development straight away.

But for my future personal projects? I'm still waiting for Qt to finish compiling.

Monday, 27 April 2009

Using the Data Query view in FDO Toolbox (part 2): CRUD operations

Read Part 1 here.

One of the new features in the recently released FDO Toolbox is the CRUD (Create, Read, Update, Delete) feature. This feature finally exposes the full read/write capabilities of the FDO API to whatever providers that support such capabilities (nearly all bundled FDO providers support the full quartet of IInsert, ISelect, IUpdate and IDelete commands).

Part 1 covered the R part of CRUD (and the many ways to do it). This part will cover the rest of the quartet.

Creating (Inserting) new features

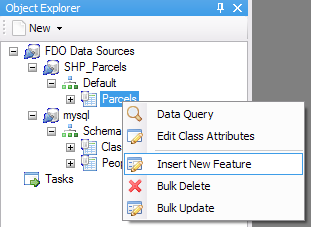
If the underlying FDO provider supports the IInsert FDO command, then you can use FDO Toolbox to insert new features into that particular data store. There are two ways to insert a new feature, you can either right click the feature class (to insert into) from the Object Explorer and choose Insert New Feature:

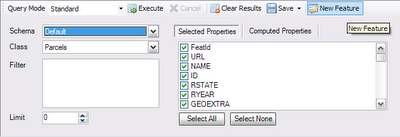
Or you can go into Data Query, select the feature class (to insert into) and click New Feature.
Either command will take you to the following dialog which will allow you to enter the attributes and geometry of this new feature:
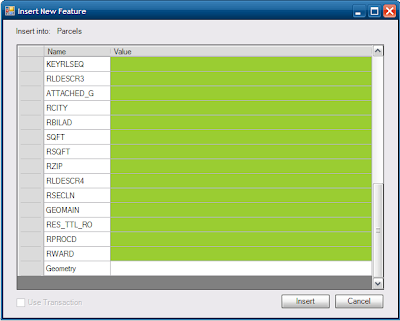
Any property/attribute with a greenish background is an optional attribute (ie. In FDO terms, it is a nullable property). To enter geometry values, specify the FGF textual form of the geometry.

Unlike SQL INSERT commands, FDO does not actually support computed expressions for insert values. For example, you can't use the CurrentDate() expression function as a value for a datetime property. This is a limitation of the FDO API, that may hopefully be addressed in the future.

If the FDO provider supports transactions, the Use Transactions check box will be available for you. Once you have entered this information, click Insert to insert the new feature.

Updating existing features

If the underlying FDO provider supports the IUpdate FDO command, then you can use FDO Toolbox to update existing features in a particular data store.

To update existing features, perform a query using the Data Query view in Standard Mode, and then right click one of the results and choose Update this Feature. It will perform some checks to determine if the resulting update will only affect the selected result. If the checks pass, you will get a dialog similar to the Insert one:
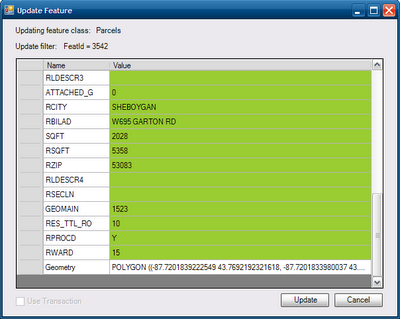
Once again, the greenish fields are optional and geometry values must be in FGF text format. Again, the Use Transaction check box is available if the FDO provider supports transactions.

Unlike SQL UPDATE commands, FDO also does not actually support computed expressions for update values. For example, you can't use the CurrentDate() expression function as a value for a datetime property. Or you cannot set a string property (eg. Name) equal to the expression Translate(Name, 'a', 'o'). This is once again, a limitation of the FDO API, that may hopefully be addressed in the future.

Make your changes and click Update to update that feature. You can verify the feature has been updated by re-running the same query, the result that was edited will have been updated.

Deleting features

If the underlying FDO provider supports the IDelete FDO command, then you can use FDO Toolbox to delete existing features in a particular data store.

To delete existing features, perform a query using the Data Query view in Standard Mode, and then right click one of the results and choose Delete this Feature. It will perform some checks to determine if the resulting delete operation will only affect the selected result. If the checks pass, you will get asked for confirmation.
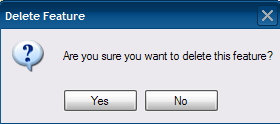
Click Yes to delete the selected feature. You can verify the feature has been deleted, by re-running the same query, the selected feature will no longer be in the query result set.

Bulk Updating features


WARNING: This is a dangerous operation. If you are not careful with the update filter specified, it could cause irreversible data changes! An empty filter, will cause bulk updates to be applied to all the data!

If the underlying FDO provider supports the IUpdate FDO command, then you can use FDO Toolbox to bulk update a series of features. When used carefully and properly, this is a useful and powerful way to change or correct certain attributes in a feature class.

To perform a bulk update, right click a feature class object in the Object Explorer and choose Bulk Update. Because of the dangerous nature of this operation, you will be asked for confirmation.


Click Yes and you will get a dialog like the one below:
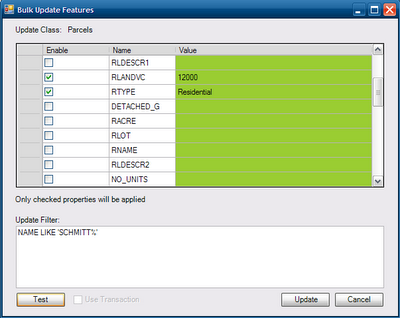
The beauty of this dialog, is that only the checked properties will be applied in the bulk update, this allows for a great degree of flexibility in your bulk updates.

If the FDO provider supports transactions, the Use Transactions check box will be available.

Specify the update filter for this bulk update. This is important, because an empty filter will apply your updated values to all the features in the feature class! You can test the update filter by clicking Test. This will check how many features the bulk update operation will affect.
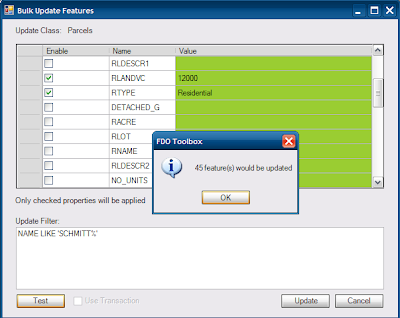
Once you are comfortable with the test results, click Update to do the real thing. Once again, due to the dangerous nature of this operation, you will be asked for confirmation. Say Yes to perform the bulk update.

Bulk Deleting features

If bulk update is Little Boy, then bulk delete is the Tsar Bomba. With that in mind...

WARNING: This is an extremely dangerous operation! If you are not careful with the delete filter specified, it could cause irreversible data loss! An empty filter, will cause the delete operation to delete everything in the feature class! You have been warned ;-)

If the underlying FDO provider supports the IDelete FDO command, then you can use FDO Toolbox to bulk delete a series of features from a data store.

To perform a bulk delete, right click the feature class object in the Object Explorer and choose Bulk Delete. Due to the potential for butchering your data, you will be asked for confirmation.


Click Yes and you will get the bulk delete dialog:
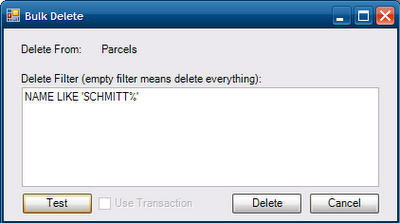

If the FDO provider supports transactions, the Use Transaction check box is available.

Unless you want to delete everything, specify a delete filter, just like the bulk update dialog, you can test to see how many features would be deleted by clicking the Test button.
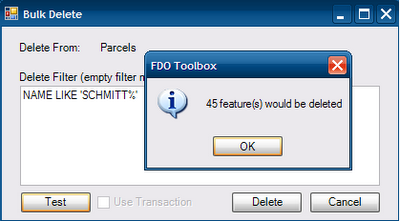

Once you are certain everything is alright, click Delete to perform the actual delete operation. Just in case you have second thoughts, you will be asked for confirmation again. Say Yes to finally start performing the bulk delete operation. The time it takes for the operation to complete depends on number of features affected (using the Test function)

And that wraps up the CRUD feature of FDO Toolbox. Watch this space for further showcases of FDO Toolbox's features.

Friday, 24 April 2009

Using the Data Query view in FDO Toolbox (part 1)

Despite all of my posts talking about new FDO Toolbox releases and its new features, I haven't actually explained these features in more intricate detail. So this is going to be the first (of many) posts covering particular features of FDO Toolbox in more detail.

We're going to start with the Data Query view. For reference, these features are explained using the current version of FDO Toolbox (0.7.5)

The Data Query view allows you to preview any FDO data source in two ways:
  • Table (attribute) view
  • Map (spatial) view
To launch the Data Query view, right click a schema object or a class object of an open connection in the Object Explorer, and choose Data Query

This will launch the Data Query view as seen below.


1. This is the query mode selector, depending on the level of support from the provider, you can choose any of the following modes of query:
  • Standard. The standard method of querying feature data.
  • Aggregate. This is the standard method, with the ability to include aggregate expressions as part of the query result.
  • SQL. This allows you to issue SQL queries directly.
2. This is the user interface for the selected query mode. This is explained in more detail below.
3. This is the query result pane, with two tabs.
  • Grid View. This allows you to view your query results in a standard data grid format.
  • Map View: This allows you to view your query results as a set of rendered features on an empty map. Map View is only avaiable in standard query mode, and only if the selected class being queried is a Feature Class
4. This button executes the query with the specified parameters. You will get a warning about large result sets if you exceed the data preview limit. This limit is defined in the user preferences, which you can change by going to Tools and choosing Preferences

5. This button will cancel the currently executing query. Any queried results will be displayed on the result pane.

6. This button will clear the result pane

7. This button will allow you to save the query result into another FDO flat-file data source. See Saving Query Results for more information.

8. This button will allow you to insert a new feature into the specified feature class. This will be explained in greater detail in part 2.

Standard Query View

The standard query view looks like the following:

  1. Indicates the current feature schema
  2. Indicates the class to be queried. If this class is not a feature class, the Map Preview will not be available
  3. Indicates the filter to apply to the query, clicking this field will launch the Expression Editor that can assist in building the filter (will be covered in a future post)
  4. Indicates the maximum number of results to return.
  5. Indicates the class properties to return as part of the query result set.
  6. Indicates any additional computed properties to return as part of the result set. This also uses the Expression Editor to define the computed properties.

Aggregate Query View

The aggregate query view is the same as the standard query view with the following additonal features


  1. Indicates whether to return a distinct set of the specified class properties.
  2. Allows you to specify grouping criteria and the group filter to apply.
SQL Query View

The SQL query view is the simplest interface of them all


  1. Allows you to enter the SQL query command.
This interface does not do any validation of the SQL query, that is handled by the underlying FDO provider. Any errors will be propagated back up to this interface and displayed in a message box.

Query Results (Grid View)

When you have executed your query you will get a table of data in your result pane like the following screen below:


The grid is read-only, none of the cells are editable. However, you can update or delete certain rows in this result set, by right clicking the row and selecting Update this feature or Delete this feature (as shown in the above screenshot). These updates and deletes will be sent back to the data source as IDelete and IUpdate FDO commands. This will be explained in part 2 in greater detail.

Query Results (Map View)

If the map view is supported, you can "visually" see the query result set. For example, the above query would look like the following.


The map view provides a standard set of toolbar commands to zoom and navigate the query result set.

Saving Query Results

One of the neat things you can do the the query result is to save it to another FDO flat-file data source. The Save toolbar button shows the available file formats the query result can be saved as. Currently the supported FDO providers are SDF and SQLite.

When saving the query result, it will also copy and apply the spatial context used by the selected feature class. This way both the queried data source and the saved query result will have the same spatial context information.

This feature is only available in Standard Query mode because it is the only mode where FDO Toolbox can interrogate the structure of the query result. There are plans to support this for SQL-based commands. When that arrives in FDO proper, expect support for it in FDO Toolbox.

Stay tuned for part 2, which will cover the CRUD (Create, Read, Update, Delete) functionality in greater detail.

Tuesday, 14 April 2009

FDO Toolbox v0.7.5 (codename: The big red button)

The Easter break gave me some time to give FDO Toolbox some attention, so here's a new release.

This one comes bundled with the just released FDO 3.4.0, which not only has newer APIs (some which this application uses), but also a much improved Oracle provider, and a more stable OGR provider, which just made it into the final release.

New Features / Changes:
  • As already mentioned, uses FDO 3.4.0 final release.
  • Express support for SQL Server 2008 spatial.
  • Schema editor now smarter in contextual mode. It will now prevent you from adding most features that may be unsupported by the current provider.
  • Protected properties (eg. Password) are now properly masked in the Generic connect and create data store dialogs.
  • ETL process now gracefully handle and log any errors that occur and continue execution.
  • CRUD (Create, Read, Update and Delete) support, now you can Create, Read, Update and Delete from any FDO data source (support varies from provider to provider, of course)
  • Data Preview is now Data Query (because of the CRUD functionality)
  • Schema editor now reverts to using GeometricType (Point, Curve, Surface, Solid) instead of GeometryType. This is to workaround a missing API from the managed wrapper.
  • Thanks to Sphinx, we now have something that resembles user documentation :-)
  • Fixes for RDBMS-related defects in the Generic connect dialog
And finally, the reason(s) for the codename:
  • Bulk Update support. Be careful with this feature! A false filter can cause irreversible changes to your spatial data. This has a test function so you can see how many features your updates will affect.
  • Bulk Delete support. Be ESPECIALLY careful with this feature! Words in all caps and bolded cannot emphasise the potential destruction to your spatial data wrought by this feature! It is so potentially dangerous that you will have to click through 2 confirmation dialogs to actually do it! This also has a test function so you can see how many features you will be deleting.
Download away!

Report bugs or feedback